
Payoneer registration Malaysia is fast and secure for freelancers, digital nomads, and remote workers. This 2025 step-by-step mobile guide walks you through everything you need, verified by actual user experience in Malaysia.
Why Choose Payoneer Registration in Malaysia?
Payoneer is a popular choice for Malaysians receiving international payments from clients and marketplaces like Upwork and Fiverr. You can easily withdraw funds to your local Malaysian bank (Maybank, CIMB, Public Bank), and manage everything with the Payoneer app.
Related: Payoneer Registration in the Philippines for Beginners: Your Mobile Guide
What You Need for Payoneer Registration Malaysia (Mobile)
- Valid Malaysian ID (MyKad or Passport, not expired)
- Active Malaysian mobile number for SMS verification
- Active email address for Payoneer notifications
- Malaysian bank account details (name must match your ID and application)
- Full residential address as on your official documents
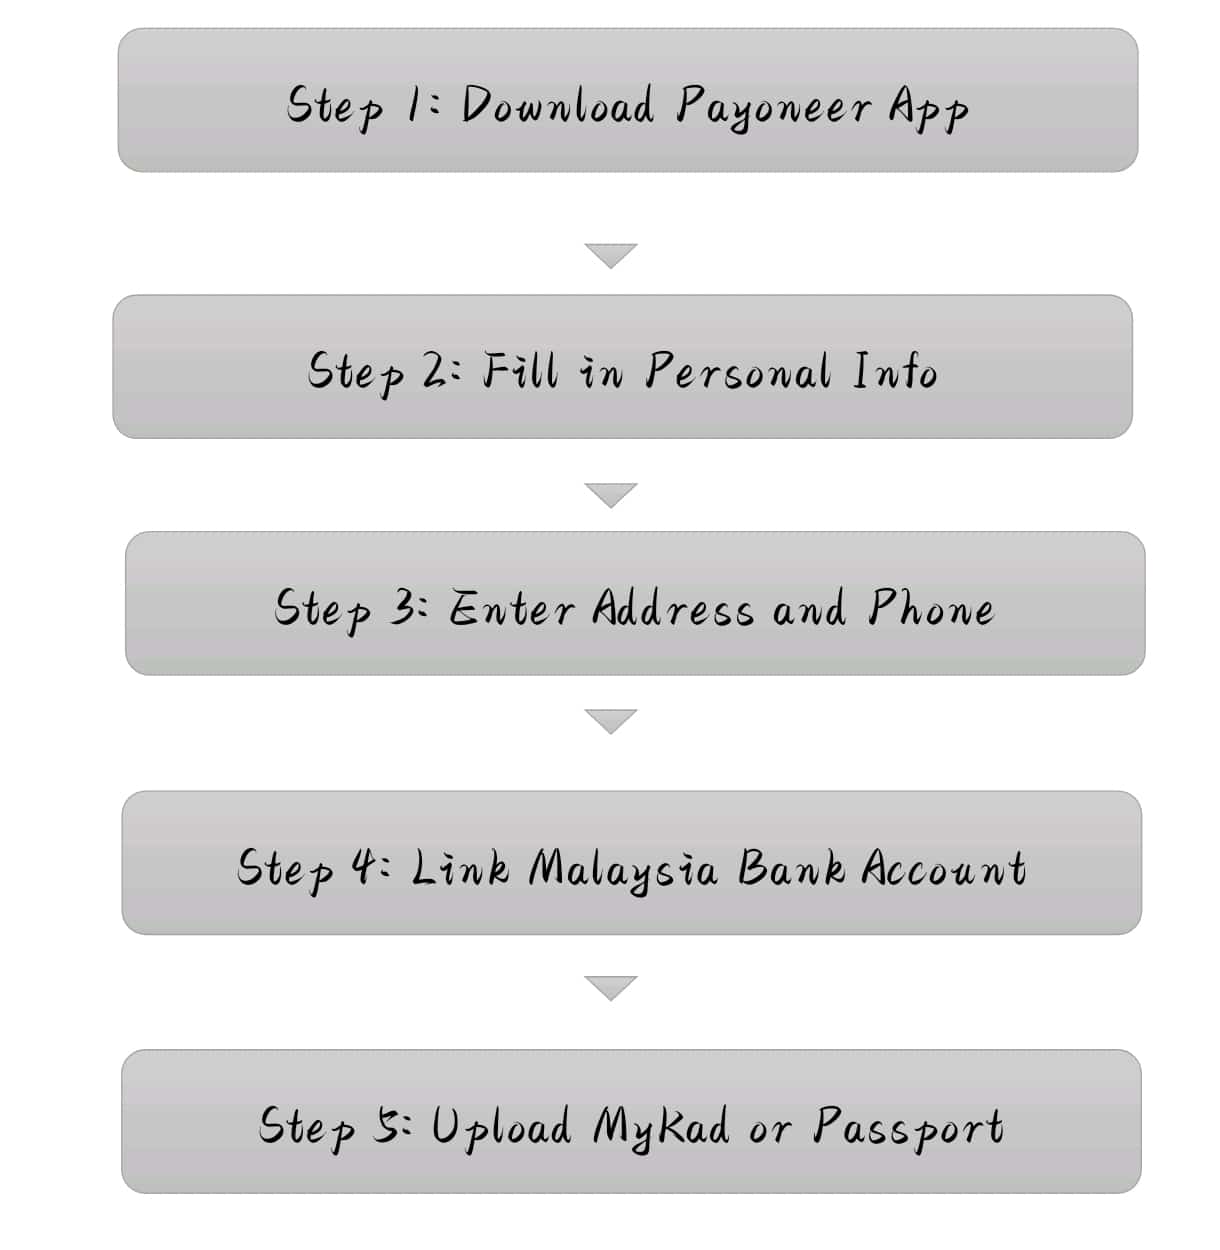
Payoneer Registration Malaysia: Step-by-Step Process
-
Download & Open the Payoneer App:
- Visit the Google Play Store or Apple App Store
- Search “Payoneer” (developer: Payoneer Inc.) and install
- Tap “Sign Up” or “Register” to start
-
Enter Basic Details:
- Choose “Individual” for freelancers and remote workers
- Input full legal name, email, date of birth (matches ID)
- Tap Next
-
Enter Contact Information:
- Country: Malaysia
- Full residential address (matches your documents)
- Malaysian mobile number (for verification SMS)
- Enter code received by SMS
-
Set Up Security Details:
- Create a strong password
- Set security question/answer
- Enter MyKad or passport number
-
Link Malaysian Bank Account:
- Confirm country/currency (Malaysia/MYR)
- Select your bank (Maybank, CIMB, Public Bank, etc.)
- Account holder’s name (matches your application)
- Bank account number
- Agree to all terms and pricing
-
Submit Application:
- Review all details, then submit
After Submitting: KYC and Payoneer Registration Malaysia Verification
- You’ll receive an email confirming your application is under review
- You may need to upload your MyKad or passport in the app’s “Verification Center”
- Approval usually takes a few hours to a few business days
- For details on verification: Payoneer Registration Indonesia Mobile Guide for Freelancers
Common Payoneer Malaysia Issues & Tips
- Be sure photos of your ID are clear, all details readable
- Your Payoneer and bank account names must match exactly
- If approval is delayed, check your email (including spam) for requests
- Payoneer charges withdrawal and conversion fees — always check the latest fee schedule
Conclusion
Payoneer registration Malaysia via mobile is simple and beginner-friendly. As long as you prepare your documents and follow this verified guide, you’ll get your account set up in no time.